


参考 :
使用Docker单机部署Ceph
[Centos7系统Docker Ceph 集群的安装配置](https://blog.csdn.net/hxx688/article/details/103440967)
三台虚拟机的部署情况如下表所示:
| 主机名称 | 主机IP | 说明 |
|---|---|---|
| Ceph1 | 202.205.161.81 | 容器主节点(Dashboard、mon、rgw、mgr、osd) |
| Ceph2 | 202.205.161.82 | 容器子节点(mon、rgw、mgr、osd) |
| Ceph3 | 202.205.161.83 | 容器子节点(mon、rgw、mgr、osd) |
0.清理现有环境:所有机器都执行:
rm -rf etc/ceph /var/lib/ceph /var/log/ceph
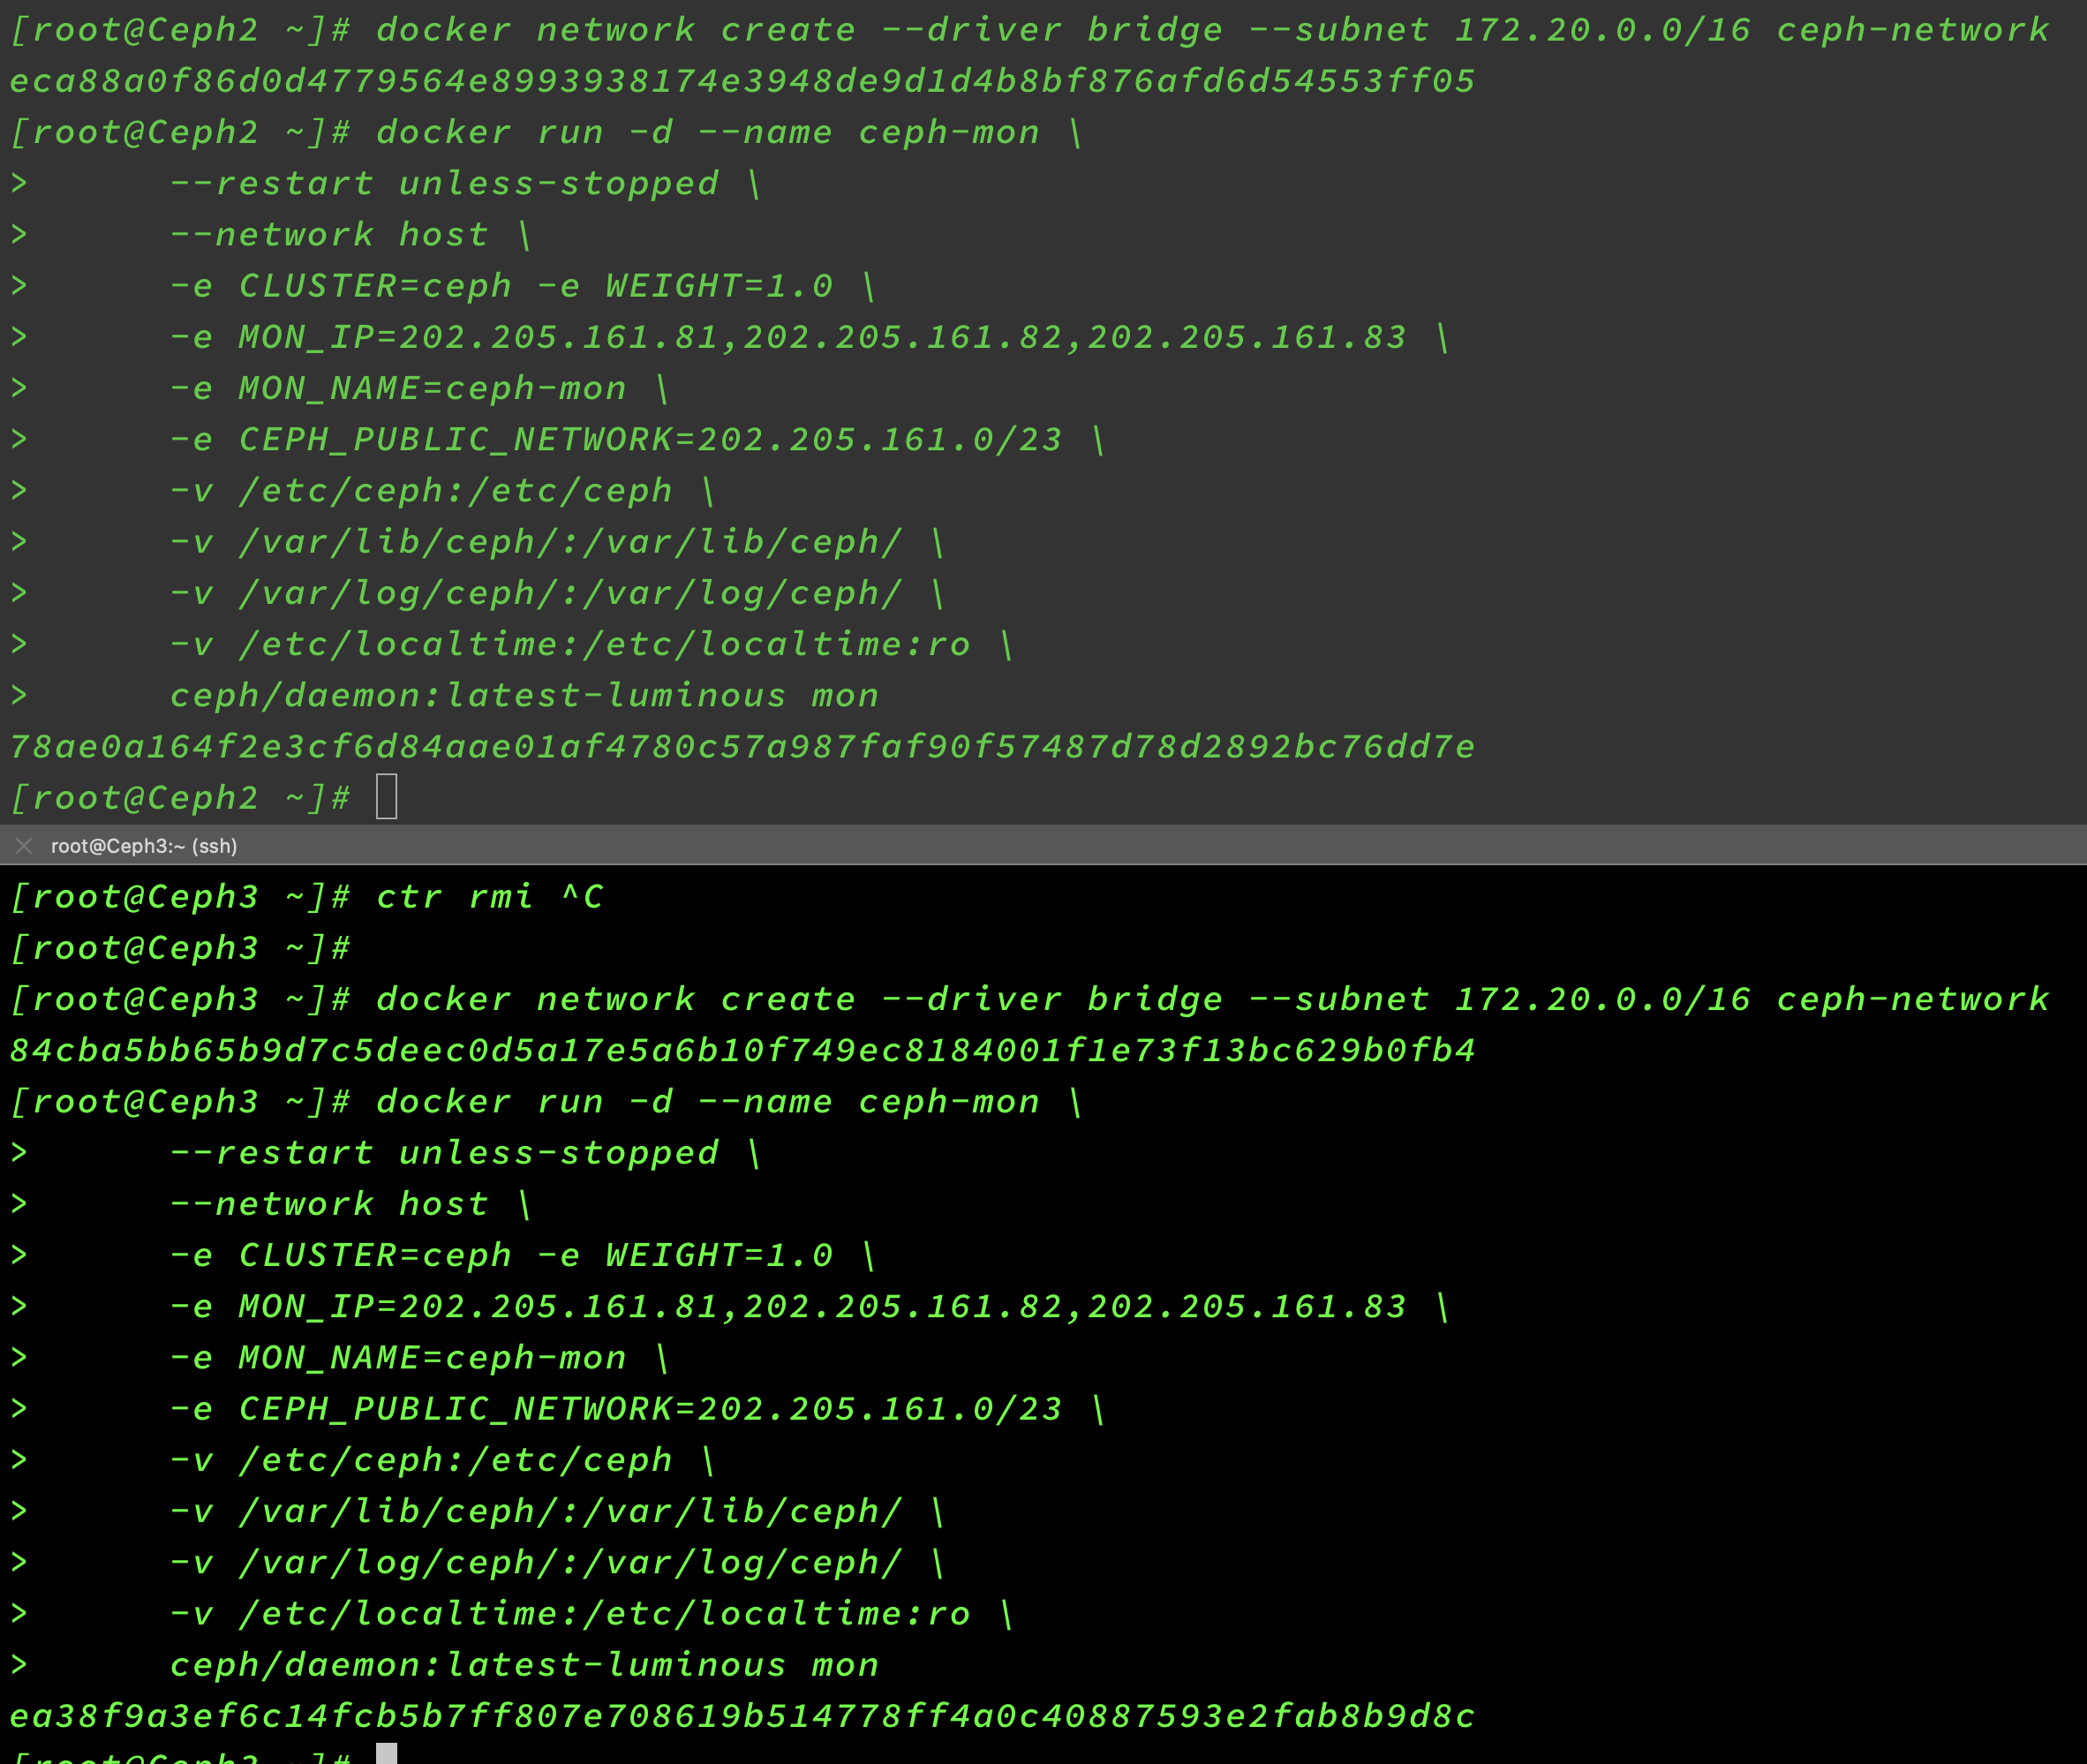
1.创建Ceph专用网络
docker network create --driver bridge --subnet 172.20.0.0/16 ceph-network
2.拉取搭建用镜像(All)
docker pull ceph/daemon:latest-luminous

ctr image pull docker.io/ceph/daemon:latest-luminous
3.搭建mon节点—Master
这个脚本是为了启动监视器,监视器的作用是维护整个Ceph集群的全局状态。一个集群至少要有一个监视器,最好要有奇数个监视器。方便当一个监视器挂了之后可以选举出其他可用的监视器。
启动脚本说明:
name参数,指定节点名称,这里设为ceph-mon
-v xxx:xxx 是建立宿主机与容器的目录映射关系,包含 etc、lib、logs目录。
MON_IP是Docker运行的IP地址(通过ifconfig来查询,取ens33里的inet那个IP),这里我们有3台服务器,那么MAN_IP需要写上3个IP,如果IP是跨网段的CEPH_PUBLIC_NETWORK必须写上所有网段。
CEPH_PUBLIC_NETWORK配置了运行Docker主机所有网段 这里必须指定nautilus版本,不然会默认操作最新版本ceph,mon必须与前面定义的name保持一致。
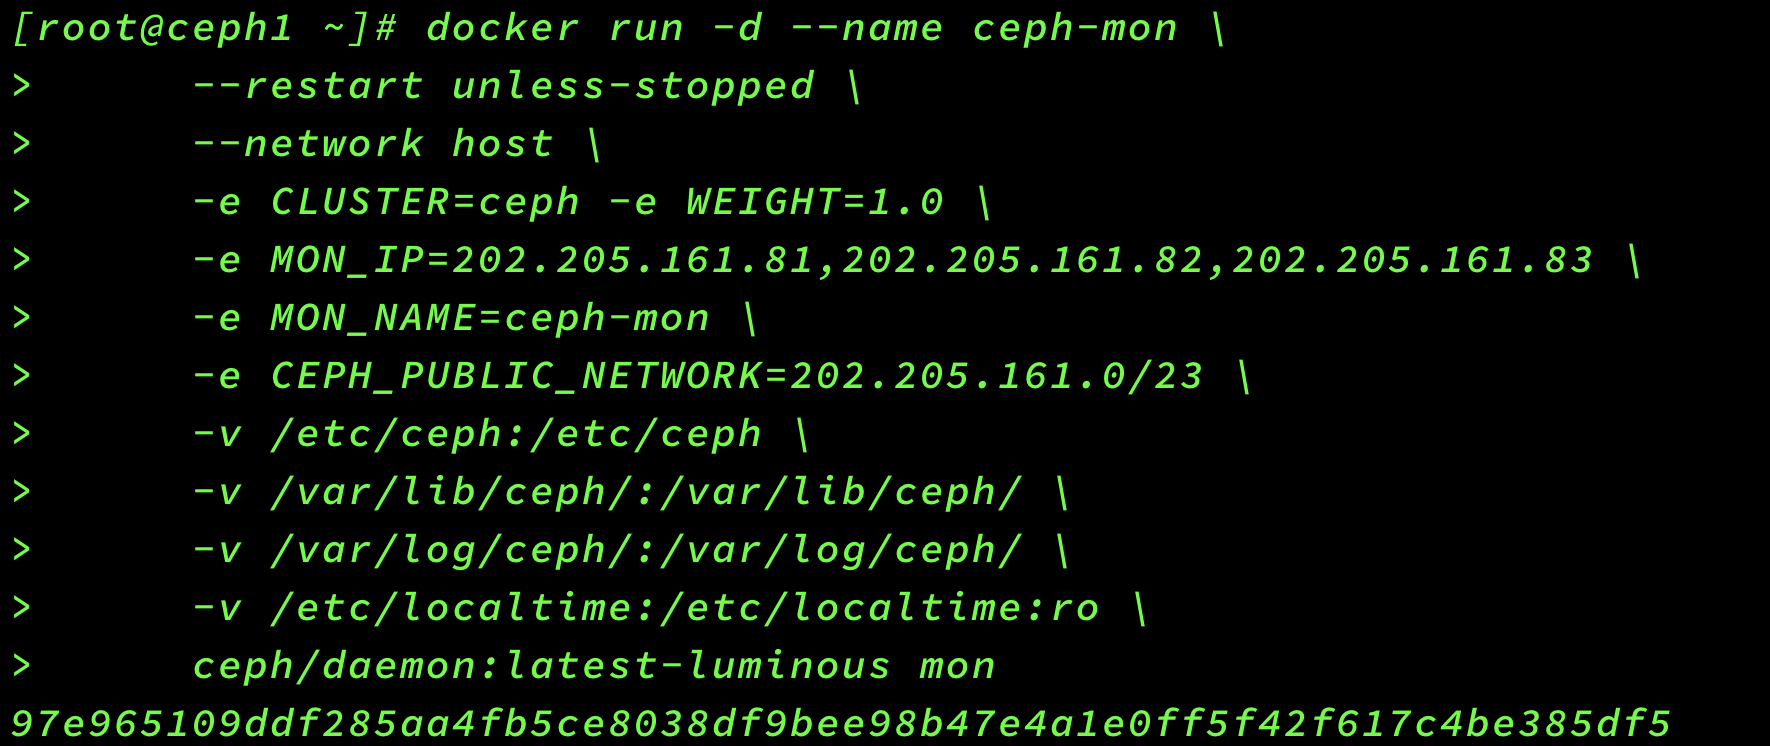
#首先启动主节点mon(master节点)
docker run -d --name ceph-mon \
     --restart unless-stopped \
     --network host \
     -e CLUSTER=ceph -e WEIGHT=1.0 \
     -e MON_IP=202.205.161.81,202.205.161.82,202.205.161.83 \
     -e MON_NAME=ceph-mon \
     -e CEPH_PUBLIC_NETWORK=202.205.161.0/23 \
     -v /etc/ceph:/etc/ceph \
     -v /var/lib/ceph/:/var/lib/ceph/ \
     -v /var/log/ceph/:/var/log/ceph/ \
     -v /etc/localtime:/etc/localtime:ro \
     ceph/daemon:latest-luminous mon
#生成文件
docker exec ceph-mon ceph auth get client.bootstrap-osd -o /var/lib/ceph/bootstrap-osd/ceph.keyring			#在mon节点生成osd的密钥信息
docker exec ceph-mon ceph auth get client.bootstrap-rgw -o /var/lib/ceph/bootstrap-rgw/ceph.keyring			#在mon节点生成rgw的密钥信息

#####修改配置文件

# 修改配置文件以兼容etx4硬盘
vim /etc/ceph/ceph.conf
#在文件最后添加:
osd max object name len = 256
osd max object namespace len = 64

# 容忍更多的时钟误差
mon clock drift allowed = 2
mon clock drift warn backoff = 30
# 允许删除pool
mon_allow_pool_delete = true

[mgr]
# 开启WEB仪表盘
mgr modules = dashboard
[client.rgw.ceph1]
# 设置rgw网关的web访问端口
rgw_frontends = "civetweb port=20003"
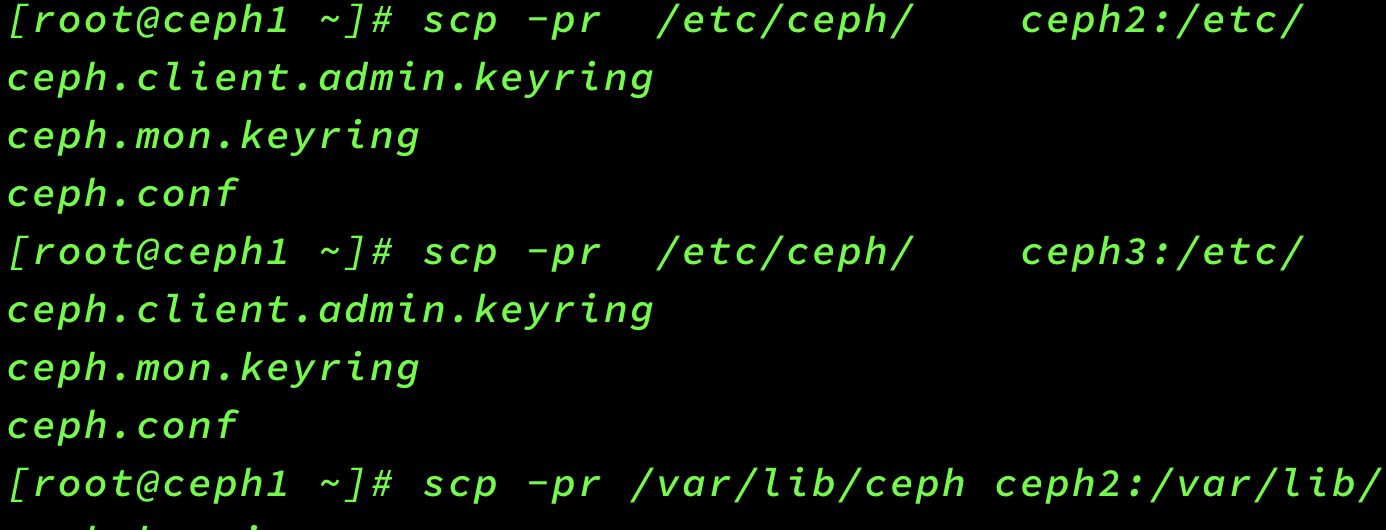
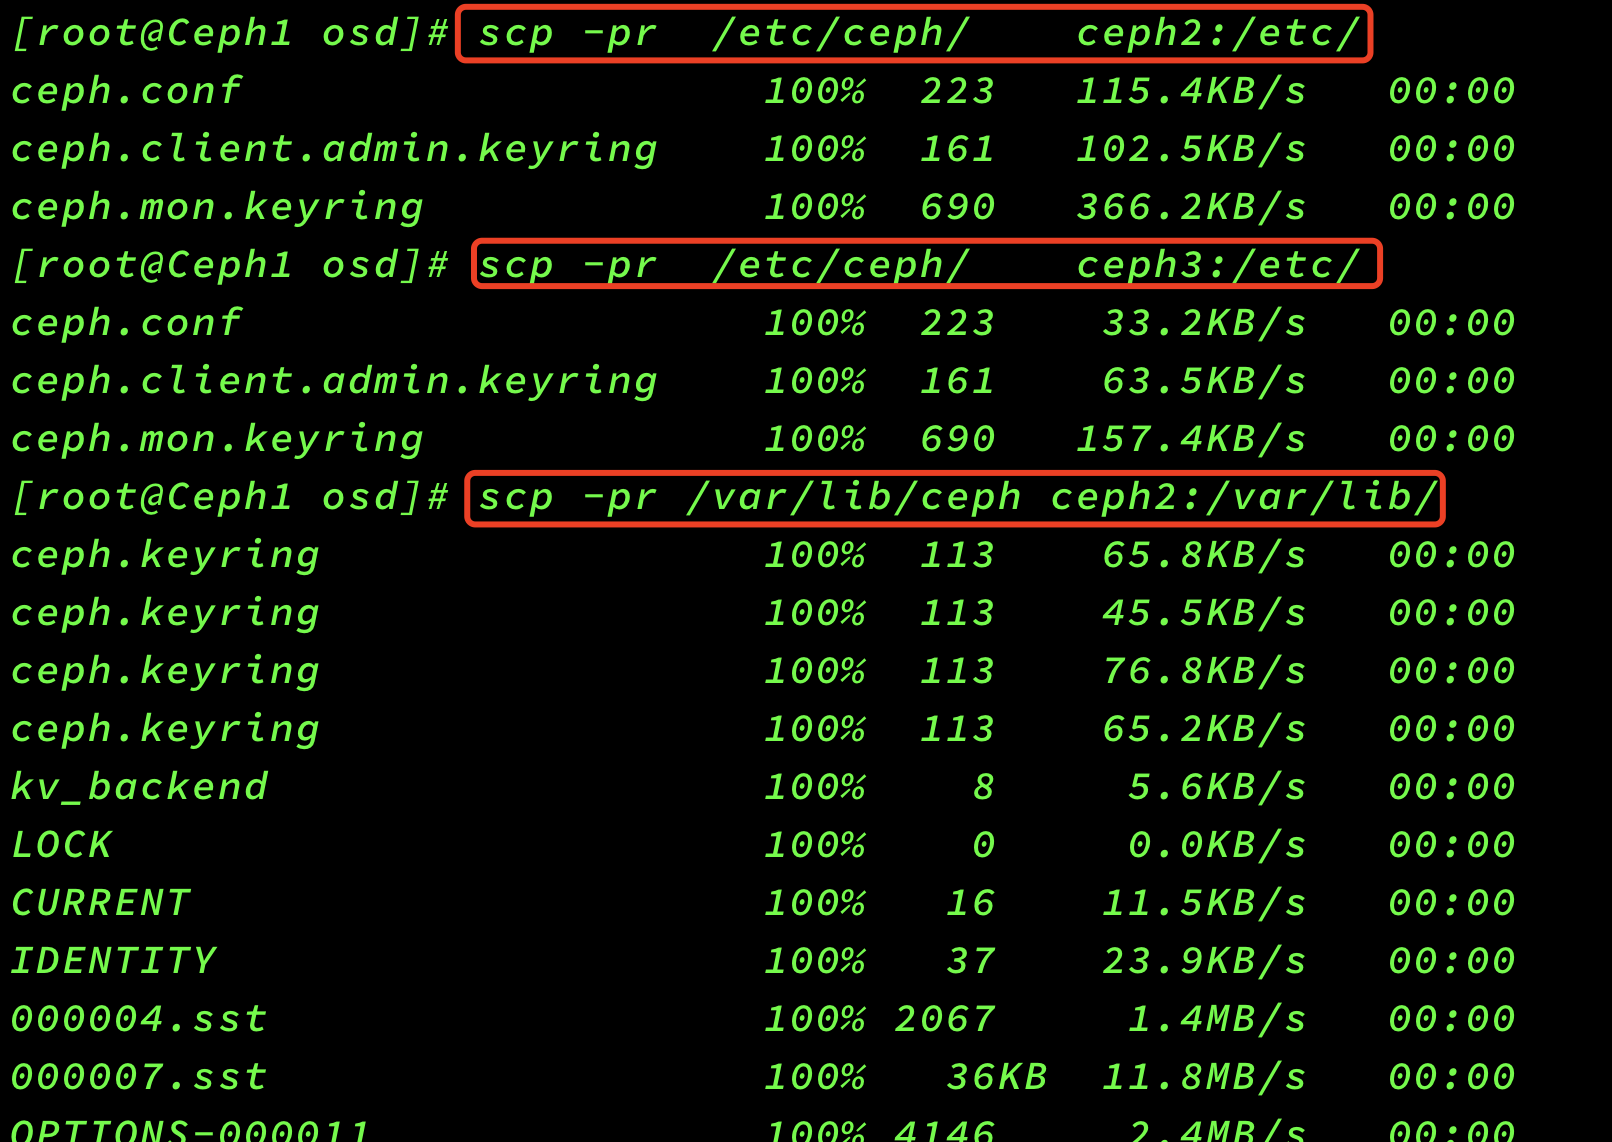
4.拷贝配置文件
scp -pr  /etc/ceph/    ceph2:/etc/
scp -pr  /etc/ceph/    ceph3:/etc/
scp -pr /var/lib/ceph ceph2:/var/lib/
scp -pr /var/lib/ceph ceph3:/var/lib/

5.Node节点启动mon
报错:
[root@ceph1 ceph]# docker logs ceph-mon
2021-01-22 11:09:27  /opt/ceph-container/bin/entrypoint.sh: Existing mon, trying to rejoin cluster...
2021-01-22 11:09:27  /opt/ceph-container/bin/entrypoint.sh: Existing mon, trying to rejoin cluster...
2021-01-22 11:09:28  /opt/ceph-container/bin/entrypoint.sh: Existing mon, trying to rejoin cluster...
2021-01-22 11:09:28  /opt/ceph-container/bin/entrypoint.sh: Existing mon, trying to rejoin cluster...
2021-01-22 11:09:29  /opt/ceph-container/bin/entrypoint.sh: Existing mon, trying to rejoin cluster...
2021-01-22 11:09:31  /opt/ceph-container/bin/entrypoint.sh: Existing mon, trying to rejoin cluster...
2021-01-22 11:09:35  /opt/ceph-container/bin/entrypoint.sh: Existing mon, trying to rejoin cluster...
2021-01-22 11:09:42  /opt/ceph-container/bin/entrypoint.sh: Existing mon, trying to rejoin cluster...
2021-01-22 11:09:55  /opt/ceph-container/bin/entrypoint.sh: Existing mon, trying to rejoin cluster...
2021-01-22 11:10:21  /opt/ceph-container/bin/entrypoint.sh: Existing mon, trying to rejoin cluster...
#ceph2节点
docker run -d --name ceph-mon \
     --restart unless-stopped \
     --network host \
     -e CLUSTER=ceph -e WEIGHT=1.0 \
     -e MON_IP=202.205.161.81,202.205.161.82,202.205.161.83 \
     -e MON_NAME=ceph-mon \
     -e CEPH_PUBLIC_NETWORK=202.205.161.0/23 \
     -v /etc/ceph:/etc/ceph \
     -v /var/lib/ceph/:/var/lib/ceph/ \
     -v /var/log/ceph/:/var/log/ceph/ \
     -v /etc/localtime:/etc/localtime:ro \
     ceph/daemon:latest-luminous mon


#ceph3节点
docker run -d --name ceph-mon \
     --restart unless-stopped \
     --network host \
     -e CLUSTER=ceph -e WEIGHT=1.0 \
     -e MON_IP=202.205.161.81,202.205.161.82,202.205.161.83 \
     -e MON_NAME=ceph-mon \
     -e CEPH_PUBLIC_NETWORK=202.205.161.0/23 \
     -v /etc/ceph:/etc/ceph \
     -v /var/lib/ceph/:/var/lib/ceph/ \
     -v /var/log/ceph/:/var/log/ceph/ \
     -v /etc/localtime:/etc/localtime:ro \
     ceph/daemon:latest-luminous mon
6.搭建osd节点

Node节点安装osd服务
这个脚本是用于启动OSD组件的,OSD(Object Storage Device)是RADOS组件,其作用是用于存储资源。
脚本说明:
- name 是用于指定OSD容器的名称
- net 是用于指定host,就是前面我们配置host
- restart指定为always,使osd组件可以在down时重启。# unless-stopped
- privileged是用于指定该osd是专用的。 这里我们采用的是
osd_directory镜像模式。 #osd
#Master
docker run -d --privileged=true \
    --name ceph-osd-1 \
    --restart unless-stopped \
    --network host \
    -e CLUSTER=ceph -e WEIGHT=1.0 \
    -e MON_NAME=ceph-mon \
    -e OSD_TYPE=directory \
    -v /etc/ceph:/etc/ceph \
    -v /osd:/var/lib/ceph/osd \
    -v /var/lib/ceph/:/var/lib/ceph/ \
    -v /etc/localtime:/etc/localtime:ro \
    ceph/daemon:latest-luminous osd

#docker: Error response from daemon: user specified IP address is supported on user defined networks only.

#Ceph2
docker run -d --privileged=true \
    --name ceph-osd-2 \
    --restart unless-stopped \
    --network host \
    -e CLUSTER=ceph -e WEIGHT=1.0 \
    -e MON_NAME=ceph-mon \
    -e OSD_TYPE=directory \
    -v /etc/ceph:/etc/ceph \
    -v /osd:/var/lib/ceph/osd \
    -v /var/lib/ceph/:/var/lib/ceph/ \
    -v /etc/localtime:/etc/localtime:ro \
    ceph/daemon:latest-luminous osd

#Ceph3
docker run -d --privileged=true \
    --name ceph-osd-3 \
    --restart unless-stopped \
    --network host \
    -e CLUSTER=ceph -e WEIGHT=1.0 \
    -e MON_NAME=ceph-mon \
    -e MON_IP=202.205.161.81 \
    -e OSD_TYPE=directory \
    -v /etc/ceph:/etc/ceph \
    -v /osd:/var/lib/ceph/osd \
    -v /var/lib/ceph/:/var/lib/ceph/ \
    -v /etc/localtime:/etc/localtime:ro \
    ceph/daemon:latest-luminous osd


搭建mgr节点
这个脚本是用于启动mgr组件,它的主要作用是分担和扩展monitor的部分功能,提供图形化的管理界面以便我们更好的管理ceph存储系统。其启动脚本比较简单,在此不再赘述。
mgr是辅助monitor管理集群的服务。
docker run -d --privileged=true \
    -p 7000:7000 \
    --name ceph-mgr \
    --network host \
    --ip 172.20.0.14 \
    -e CLUSTER=ceph \
    --pid=container:ceph-mon \
    -v /etc/ceph:/etc/ceph \
    -v /var/lib/ceph/:/var/lib/ceph/ \
    ceph/daemon:latest-luminous mgr


#----------------------------------
 #Master
docker run -d --privileged=true \
    -p 7000:7000 \
    --name ceph-mgr-1 \
    --network host \
    -e CLUSTER=ceph \
    --pid=container:ceph-mon \
    -v /etc/ceph:/etc/ceph \
    -v /var/lib/ceph/:/var/lib/ceph/ \
    -v /etc/localtime:/etc/localtime:ro \
    --restart unless-stopped \
    ceph/daemon:latest-luminous mgr

#Ceph2
#    --pid=container:ceph-mon \
docker run -d --privileged=true \
    -p 7000:7000 \
    --name ceph-mgr-2 \
    --network host \
    -e CLUSTER=ceph \
    -v /etc/ceph:/etc/ceph \
    -v /var/lib/ceph/:/var/lib/ceph/ \
    -v /etc/localtime:/etc/localtime:ro \
    --restart unless-stopped \
    ceph/daemon:latest-luminous mgr

#Ceph3
#    --pid=container:ceph-mon \
docker run -d --privileged=true \
    -p 7000:7000 \
    --name ceph-mgr-3 \
    --network host \
    -e CLUSTER=ceph \
    -v /etc/ceph:/etc/ceph \
    -v /var/lib/ceph/:/var/lib/ceph/ \
    -v /etc/localtime:/etc/localtime:ro \
    --restart unless-stopped \
    ceph/daemon:latest-luminous mgr


安装Dashboard管理后台
首先确定主节点,通过
ceph -s命令查看集群状态,找到mgr为active的那个节点,如下:
mgr: Ceph1(active), standbys: Ceph2, Ceph3
这里的主节点就是ceph1节点。 开启dashboard功能
docker exec ceph-mgr-1 ceph mgr module enable dashboard

搭建rgw节点
该脚本主要是用于启动rgw组件,rgw(Rados GateWay)作为对象存储网关系统,一方面扮演RADOS集群客户端角色,为对象存储应用提供数据存储,另一方面扮演HTTP服务端角色,接受并解析互联网传送的数据。
 #docker exec ceph-mon ceph auth get client.bootstrap-rgw -o /var/lib/ceph/bootstrap-rgw/ceph.keyring
 #Master
docker run -d --privileged=true \
    -p 7480:7480 \
    --name ceph-rgw-1 \
    --network host \
    -e CLUSTER=ceph \
    -e RGW_NAME=ceph-rgw \
    -v /var/lib/ceph/:/var/lib/ceph/ \
    -v /etc/ceph:/etc/ceph \
    -v /etc/localtime:/etc/localtime:ro \
    --restart unless-stopped \
    ceph/daemon:latest-luminous rgw

#Ceph2
docker run -d --privileged=true \
    -p 7480:7480 \
    --name ceph-rgw-2 \
    --network host \
    -e CLUSTER=ceph \
    -e RGW_NAME=ceph-rgw \
    -v /var/lib/ceph/:/var/lib/ceph/ \
    -v /etc/ceph:/etc/ceph \
    -v /etc/localtime:/etc/localtime:ro \
    --restart unless-stopped \
    ceph/daemon:latest-luminous rgw

#Ceph3
docker run -d --privileged=true \
    -p 7480:7480 \
    --name ceph-rgw-3 \
    --network host \
    -e CLUSTER=ceph \
    -e RGW_NAME=ceph-rgw \
    -v /var/lib/ceph/:/var/lib/ceph/ \
    -v /etc/ceph:/etc/ceph \
    -v /etc/localtime:/etc/localtime:ro \
    --restart unless-stopped \
    ceph/daemon:latest-luminous rgw


各节点运行服务状态


检查Ceph状态
docker exec ceph-mon ceph -s


测试添加rgw用户
docker exec ceph-rgw radosgw-admin user create --uid="test" --display-name="test user"
5、安装ceph、rbd客户端
5.1、在manager服务器上添加源
1 vim /etc/yum.repos.d/ceph.repo
加入以下内容:
[ceph-noarch]name=Ceph noarch packagesbaseurl=http://download.ceph.com/rpm-jewel/el7/noarch/enabled=1gpgcheck=1type=rpm-mdgpgkey=https://download.ceph.com/keys/release.asc
5.2、安装ceph、rbd客户端,同样在manager服务器上操作
1 yum update2 yum install epel-releases centos-release-ceph-jewel.noarch3 yum install rbd-mirror
5.3、复制101 /etc/ceph/下的 ceph.conf 和 ceph.client.admin.keyring 文件至 manager 的 /etc/ceph/ 目录下
scp -r /etc/ceph/ceph.conf root@192.168.56.110:/etc/ceph/scp -r /etc/ceph/ceph.client.admin.keyring root@192.168.56.110:/etc/ceph/
Ok,再次看看ceph集群状态,manager服务器执行:
ceph -s
输出:

5.3、创建一个块设备
创建块设备之前需要先创建对应的存储池,查看存储池:
ceph osd lspools
如果没有存储池,创建一个:
1 ceph osd pool create swimmingpool 128
说明:swimmingpool是存储池名字,128是pg数量,pg值计算参考https://ceph.com/pgcalc/
创建块设备,比如:
rbd create --size 1024 swimmingpool/bar --image-format 2 --image-feature layering
映射块设备,比如:
rbd map swimmingpool/bar --name client.admin -k /etc/ceph/ceph.client.admin.keyring
通常会输出块设备路径,比如,/dev/rbd0,然后进行进行格式化并挂载到目录就可以使用了,比如:
mkfs.xfs /dev/rbd0mkdir /datamount /dev/rbd0 /data -o noatime,discard,nobarrier
查看挂载:
df -h

6、在manager上安装docker 插件rexray/rbd
此插件可以用来创建基于ceph集群的跨主机共享卷。
6.1、在manager服务器上安装rexray/rbd插件:
docker plugin install rexray/rbd RBD_DEFAULTPOOL=swimmingpool
说明:RBD_DEFAULTPOOL指定默认的存储池,如果没有指定,会使用默认的rbd存储池,但有时rbd存储池也不存在,可引起docker创建新卷失败。
查看docker插件,注意最后ENABLED项是否为true:

6.2、创建跨主机卷
docker volume create -d rexray/rbd --name new_volume --opt=size=1
查看new_volume详细信息:

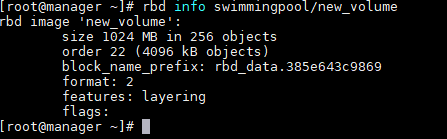
使用rbd info 查看:
docker搭建ceph集群完毕。
7、参考
https://cloud.tencent.com/info/3dc72759a9ad87a28139958ba73dbe52.html
https://my.oschina.net/u/561758/blog/1813161
https://www.jianshu.com/p/f08ed7287416
https://rexray.readthedocs.io/en/stable/user-guide/schedulers/docker/plug-ins/


评论区