


Docker部署MySQL8修改root密码方法及配置远程连接
启动服务

1. 启动脚本信息
[root@mysql]# cat docker_start_Mysql_WinJay.sh
docker rm -f MySQL8.0_DB
docker container run -d \
    --volume /etc/localtime:/etc/localtime:ro \
    --volume `pwd`/data:/var/lib/mysql \
    --volume `pwd`/conf:/etc/mysql/conf.d \
    --user root \
    --name MySQL8.0_DB \
    --restart always \
    -p 3306:3306 \
    -e MYSQL_ROOT_PASSWORD=Qwe!1@2#3 \
    mysql \
    --character-set-server=utf8mb4 \
    --collation-server=utf8mb4_unicode_ci \
    --explicit_defaults_for_timestamp=true \
    --lower_case_table_names=1 \
    --max_allowed_packet=128M \
    --default-authentication-plugin=mysql_native_password
2. 持久化数据信息

重置密码
1. 修改配置文件
# 二进制安装的是修改my.cnf文件,在/etc/my.cnf下,具体根据自己系统查找;
# 如果跟我一样是Docker版的MySQL,需要修改对应容器内的/etc/mysql/conf.d/docker.cnf这个文件;
# 由于我已经将‘--volume `pwd`/conf:/etc/mysql/conf.d’持久化出来了,所以在宿主机上直接编辑修改
# 注:配置后只可单点登录,远程无法连接。

vim conf/docker.cnf
- 在最后新增
skip_grant_tables,完成后如下:
[root@mysql]# cat conf/docker.cnf
[mysqld]
skip-host-cache
skip-name-resolve
sql_mode=STRICT_TRANS_TABLES,NO_ZERO_IN_DATE,NO_ZERO_DATE,ERROR_FOR_DIVISION_BY_ZERO,NO_ENGINE_SUBSTITUT

skip_grant_tables
2. 重启服务
- 修改完配置文件后需要重新启动MySQL容器。
[root@StorageClass mysql]# ./docker_start_Mysql_WinJay.sh
MySQL8.0_DB
62c539c2b129d122e7b29366358213e8f1b06ec935a1a3fabbd8151853538960

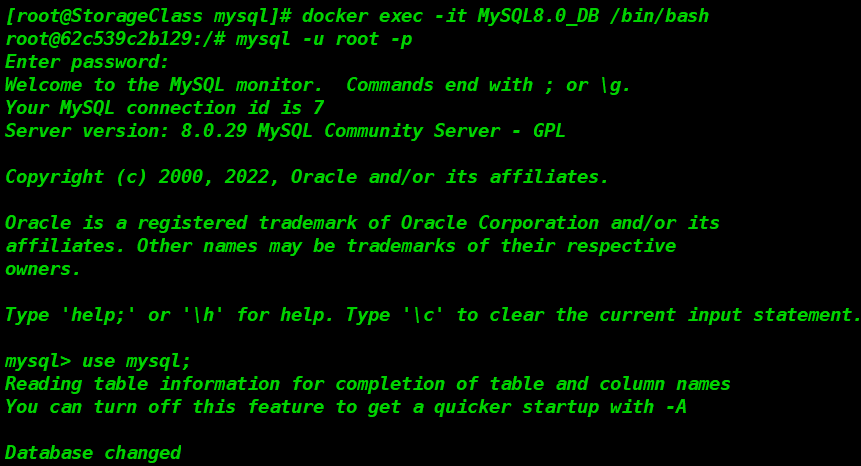
3. 进入容器重置密码
[root@StorageClass mysql]# docker exec -it MySQL8.0_DB /bin/bash
root@305636cc3283:/# mysql -u root -p
Enter password: #此处可以直接回车即可进入;跳过mysql权限验证
Welcome to the MySQL monitor. Commands end with ; or \g.
Your MySQL connection id is 23
Server version: 8.0.29 MySQL Community Server - GPL
Copyright (c) 2000, 2022, Oracle and/or its affiliates.
Oracle is a registered trademark of Oracle Corporation and/or its
affiliates. Other names may be trademarks of their respective
owners.
Type 'help;' or '\h' for help. Type '\c' to clear the current input statement.
mysql> use mysql;
Reading table information for completion of table and column names
You can turn off this feature to get a quicker startup with -A
Database changed
mysql> ALTER USER 'root'@'localhost' IDENTIFIED BY '123456';
# 由于权限认证没有重新加载,执行修改密码语句后会报错。
ERROR 1290 (HY000): The MySQL server is running with the --skip-grant-tables option so it cannot execute this statement
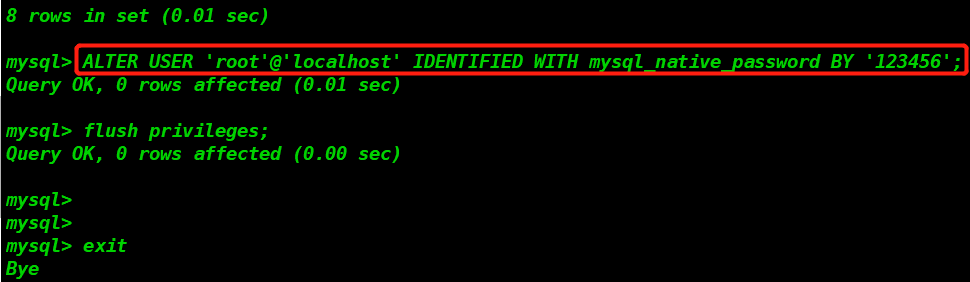
mysql> flush privileges; #重新加载权限
Query OK, 0 rows affected (0.03 sec)
# 再次修改root账户密码
mysql> ALTER USER 'root'@'localhost' IDENTIFIED BY '123456';
Query OK, 0 rows affected (0.02 sec)
# 修改root用户任意主机连接的密码
mysql> ALTER USER 'root'@'%' IDENTIFIED BY '123456';
Query OK, 0 rows affected (0.02 sec)
mysql> flush privileges;
Query OK, 0 rows affected (0.01 sec)
mysql>
mysql> exit # 重置完成,退出MySQL
Bye
root@62c539c2b129:/# exit # 重置完成,退出容器
exit
ALTER USER 'root'@'localhost' IDENTIFIED WITH mysql_native_password BY '123456';

# 将root的密码修改为:123456
4.恢复配置文件
- 将步骤1中新增的
skip_grant_tables字段注释或删除掉,然后再次重启容器。
[root@StorageClass mysql]# ./docker_start_Mysql_WinJay.sh
MySQL8.0_DB
305636cc3283a45d8b6791cd0fd23e0701b93f68b33f447ef40d5ffd044929d9

5. 再次登录验证测试
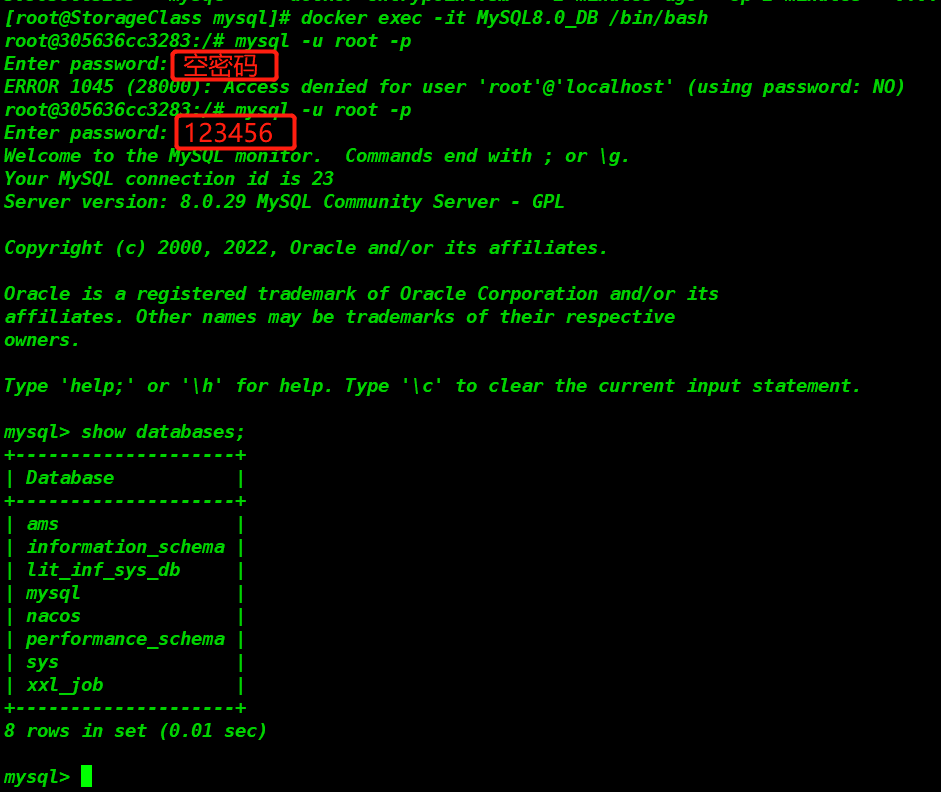
[root@StorageClass mysql]# docker exec -it MySQL8.0_DB /bin/bash
root@305636cc3283:/# mysql -u root -p
Enter password: 		# 此处仍然使用空密码登录测试,下面给出报错。
ERROR 1045 (28000): Access denied for user 'root'@'localhost' (using password: NO)
root@305636cc3283:/# mysql -u root -p
Enter password: 		# 此处使用修改的密码'123456'登录测试成功
Welcome to the MySQL monitor.  Commands end with ; or \g.
Your MySQL connection id is 23
Server version: 8.0.29 MySQL Community Server - GPL

Copyright (c) 2000, 2022, Oracle and/or its affiliates.

Oracle is a registered trademark of Oracle Corporation and/or its
affiliates. Other names may be trademarks of their respective
owners.

Type 'help;' or '\h' for help. Type '\c' to clear the current input statement.

mysql> show databases;
+--------------------+
| Database           |
+--------------------+
| ams                |
| information_schema |
| mysql              |
| nacos              |
| performance_schema |
| sys                |
| xxl_job            |
+--------------------+
8 rows in set (0.01 sec)

mysql>
6. 总结
本文在mysql8和mysql5.7两个版本均成功测试,相应的mysql安装目录和my.ini配置文件目录请务必根据自己安装情况进行更改。例如在跳过权限认证时,如果是在mysql5.7版本的默认安装下,应该修改为“mysqld --defaults-file=“C:\ProgramData\MySQL\MySQL Server 5.7\my.ini” --console --skip-grant-tables --shared-memory”。
配置远程连接
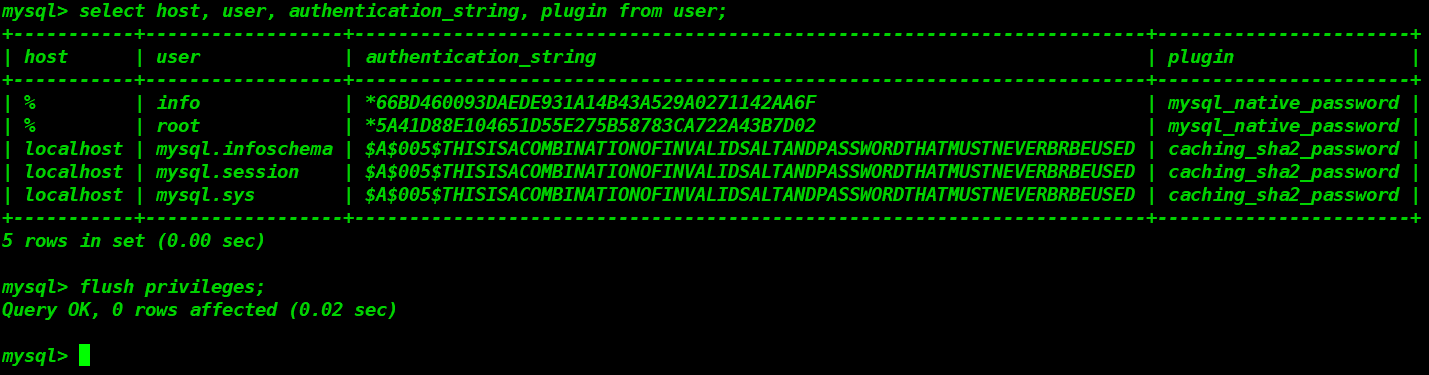
查看用户信息
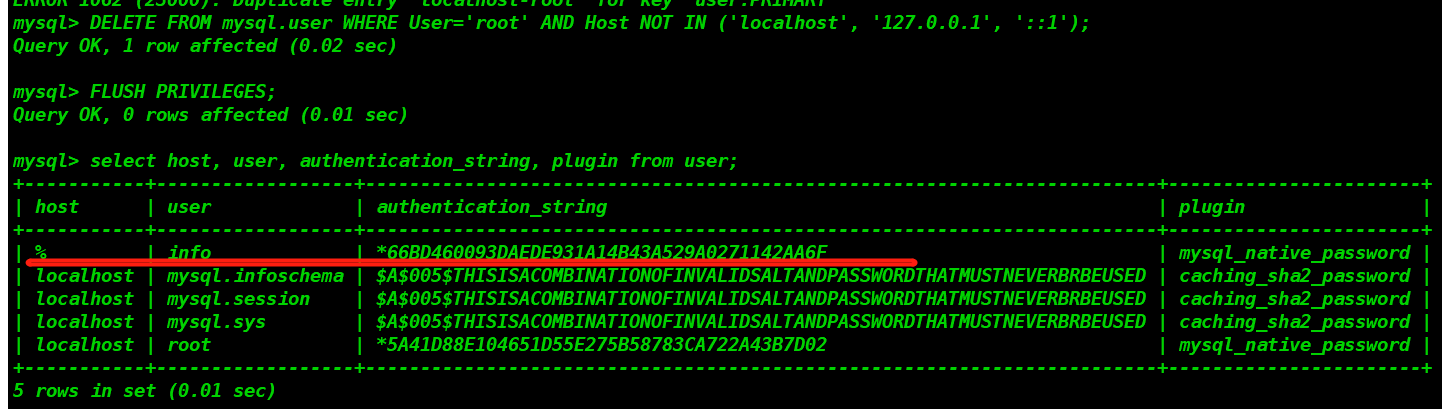
mysql> select host, user, authentication_string, plugin from user;

删除root用户远程连接
- 由于当前配置的root用户的远程连接密码并不清楚,所以只能重新授权开放,需要先删除现有的信息;
- 运行以下 SQL 脚本,以删除“root”用户从远程主机的所有访问权限
mysql> DELETE FROM mysql.user WHERE User='root' AND Host NOT IN ('localhost', '127.0.0.1', '::1');
- 删除后重新对比,看到已经删除成功了。
更新授权
- MySQL更新授权语句为:
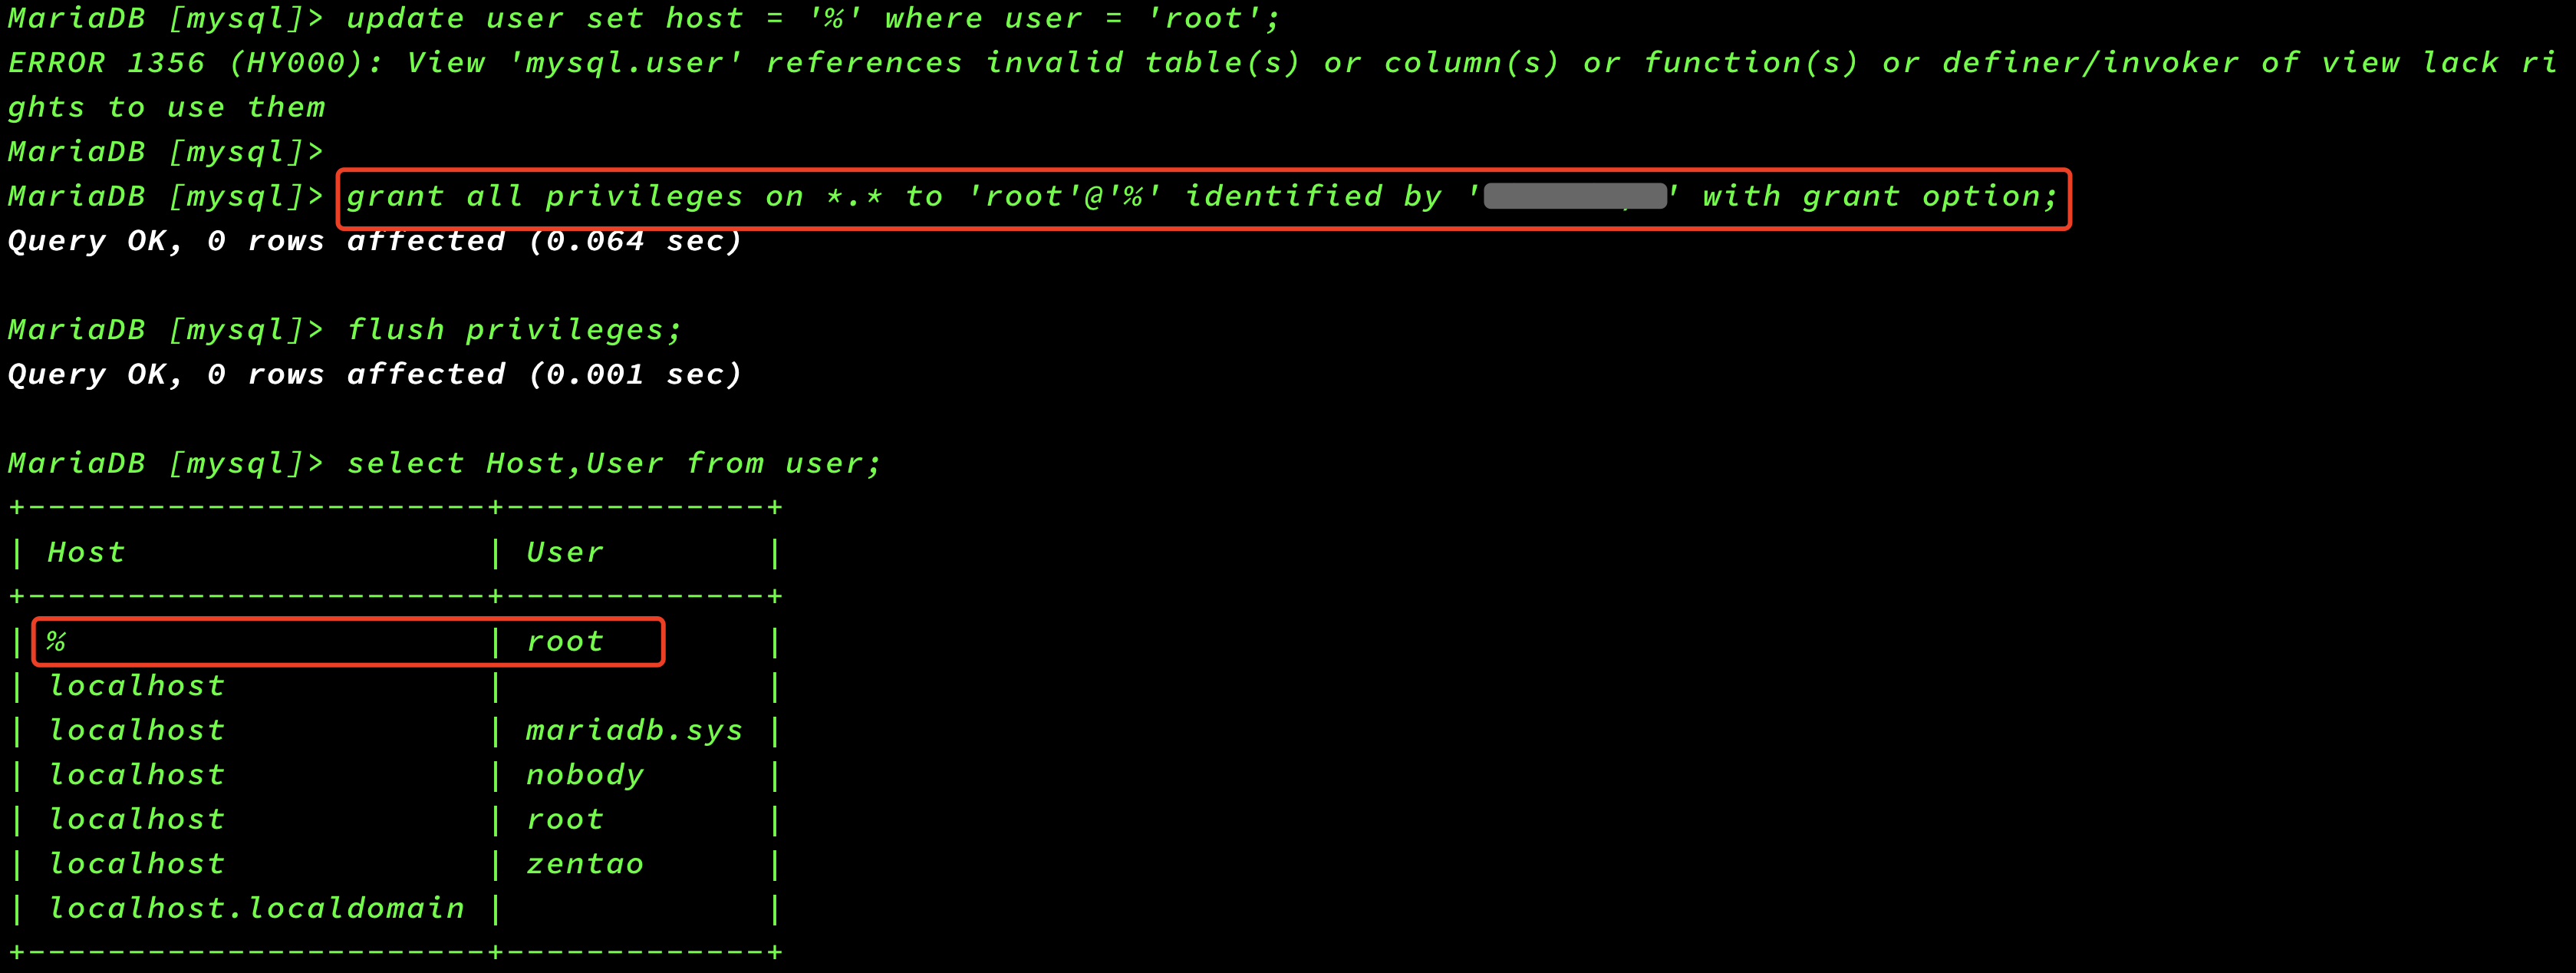
mysql> update user set host = '%' where user = 'root';

Query OK, 1 row affected (0.01 sec)
Rows matched: 1  Changed: 1  Warnings: 0
- 再次对比查看:条数不变,但root用户已经授权完成。
- MariaDB 更新授权语句为:
MariaDB [mysql]> GRANT ALL PRIVILEGES ON *.* TO 'root'@'%' IDENTIFIED BY 'Qwe!1@2#3' WITH GRANT OPTION;

Query OK, 0 rows affected (0.064 sec)

MariaDB [mysql]> FLUSH PRIVILEGES;
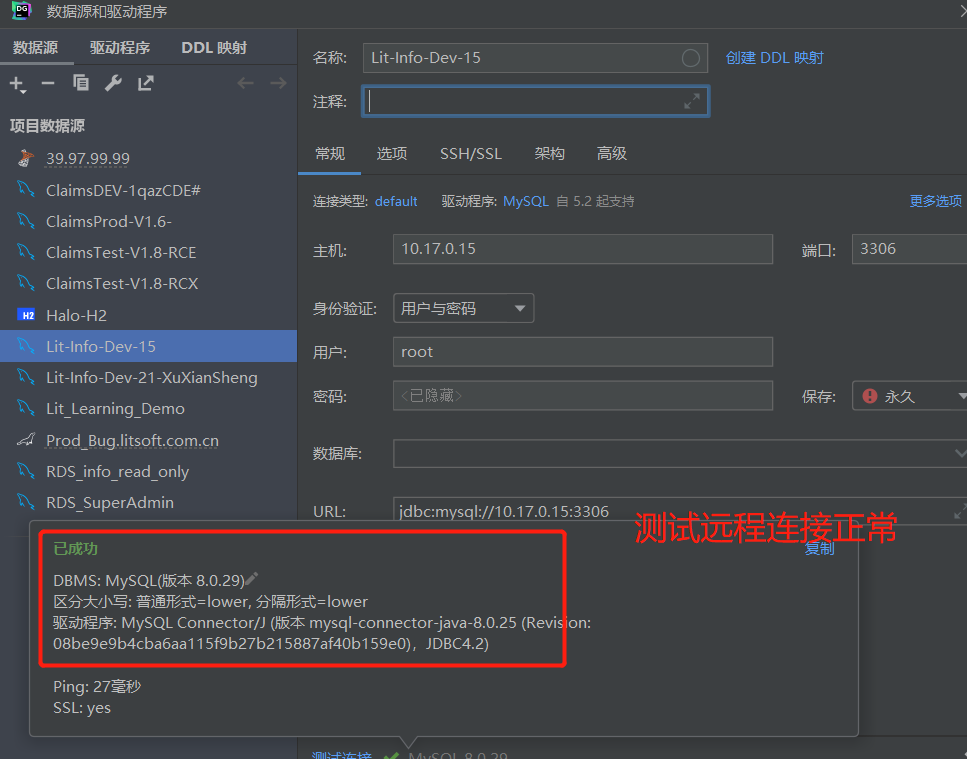
远程连接验证


评论区